
Monday, December 12, 2016
Week 16 | Final project Update 5/5
Final Documentation:
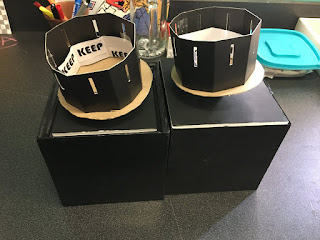
"Keep Moving"
Fritzing Diagram:
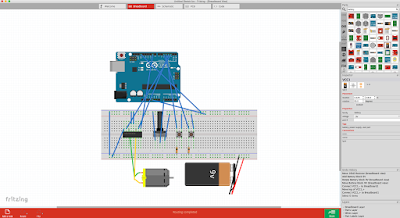
Code used:
const int controlPin1 = 2;
const int controlPin2 = 3;
const int enablePin = 9;
const int directionSwitchPin = 4;
const int onOffSwitchStateSwitchPin = 5;
const int potPin = A0;
int onOffSwitchState = 0;
int previousOnOffSwitchState = 0;
int directionSwitchState = 0;
int previousDirectionSwitchState = 0;
int motorEnabled = 0;
int motorSpeed = 0;
int motorDirection = 1;
void setup(){
pinMode(directionSwitchPin, INPUT);
pinMode(onOffSwitchStateSwitchPin, INPUT);
pinMode(controlPin1, OUTPUT);
pinMode(controlPin2, OUTPUT);
pinMode(enablePin, OUTPUT);
digitalWrite(enablePin, OUTPUT);
}
void loop(){
onOffSwitchState =
digitalRead(onOffSwitchStateSwitchPin);
delay(1);
directionSwitchState =
digitalRead(directionSwitchPin);
motorSpeed = analogRead(potPin)/4;
if(onOffSwitchState != previousOnOffSwitchState){
if(onOffSwitchState == HIGH){
motorEnabled = !motorEnabled;
}
}
if (directionSwitchState !=
previousDirectionSwitchState){
if (directionSwitchState == HIGH){
motorDirection = !motorDirection;
}
}
if (motorDirection == 1){
digitalWrite(controlPin1, HIGH);
digitalWrite(controlPin2, LOW);
}
else {
digitalWrite(controlPin1, LOW);
digitalWrite(controlPin2, HIGH);
}
if (motorEnabled == 1){
analogWrite(enablePin, motorSpeed);
}
else{
analogWrite(enablePin, 0);
}
previousDirectionSwitchState =
directionSwitchState;
previousOnOffSwitchState = onOffSwitchState;
}
"Keep Moving"

Fritzing Diagram:

Code used:
const int controlPin1 = 2;
const int controlPin2 = 3;
const int enablePin = 9;
const int directionSwitchPin = 4;
const int onOffSwitchStateSwitchPin = 5;
const int potPin = A0;
int onOffSwitchState = 0;
int previousOnOffSwitchState = 0;
int directionSwitchState = 0;
int previousDirectionSwitchState = 0;
int motorEnabled = 0;
int motorSpeed = 0;
int motorDirection = 1;
void setup(){
pinMode(directionSwitchPin, INPUT);
pinMode(onOffSwitchStateSwitchPin, INPUT);
pinMode(controlPin1, OUTPUT);
pinMode(controlPin2, OUTPUT);
pinMode(enablePin, OUTPUT);
digitalWrite(enablePin, OUTPUT);
}
void loop(){
onOffSwitchState =
digitalRead(onOffSwitchStateSwitchPin);
delay(1);
directionSwitchState =
digitalRead(directionSwitchPin);
motorSpeed = analogRead(potPin)/4;
if(onOffSwitchState != previousOnOffSwitchState){
if(onOffSwitchState == HIGH){
motorEnabled = !motorEnabled;
}
}
if (directionSwitchState !=
previousDirectionSwitchState){
if (directionSwitchState == HIGH){
motorDirection = !motorDirection;
}
}
if (motorDirection == 1){
digitalWrite(controlPin1, HIGH);
digitalWrite(controlPin2, LOW);
}
else {
digitalWrite(controlPin1, LOW);
digitalWrite(controlPin2, HIGH);
}
if (motorEnabled == 1){
analogWrite(enablePin, motorSpeed);
}
else{
analogWrite(enablePin, 0);
}
previousDirectionSwitchState =
directionSwitchState;
previousOnOffSwitchState = onOffSwitchState;
}
Week 16 | Final Project Update 4/5
After assembling one of the zoetropes successfully, I'm now going to assemble the second one. I'm planning on using sturdy foam board as a cover. The boxes I made will hide the arduino and breadboard. Only the motor and whats assembled above will be seen.
Final_Project
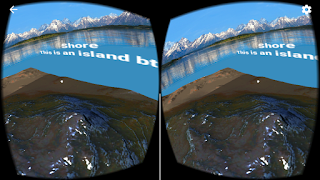
These are pictures and screenshots of the VR headset and apps I made in Unity. I used my iPhone 6S because its screen is bigger than my Samsung Galaxy S3 Mini.


Final_Project Diagram
Since I did not use the Arduino at all, I made a different diagram of my project:

-It shows the process of developing it, starting with the Google Cardboard SDK version 1.1.

-It shows the process of developing it, starting with the Google Cardboard SDK version 1.1.
Sunday, December 11, 2016
Final_Project[4] = MountainVR
-This is the last version
-I had a hard time to make the MainCamera see the Mountain. For some reason it was only seeing the skybox
-My original idea was to put the MainCamera above the highest mountain, so you can see the whole thing, but MainCamera would only see through the Mountain (and the entire GameObject).
Final_Project[3] = GazeInput
-This one took me a while to make it work.
-It is from a tutorial, but unfortunately, it used a very old version of the Google Cardboard SDK, so when I tried to use the scripts, Unity told me that they were deprecated and recommended to se the current versions.
-The ball was supposed to turn blue after 3 seconds of staring at it, but, again, with the current Google Cardboard SDK version, I had to add an Even Trigger System that only handles OnPointerEnter and OnPointerExit, even though GvrReticlePointer Script from the SDK has a OnPointerHover() function called every frame the user is still pointing at a valid GameObject, but I could not get it to work.
Subscribe to:
Posts (Atom)