
Showing posts with label Vanessa Puello. Show all posts
Showing posts with label Vanessa Puello. Show all posts
Monday, December 12, 2016

Week 16 | Final project Update 5/5
Final Documentation:
"Keep Moving"
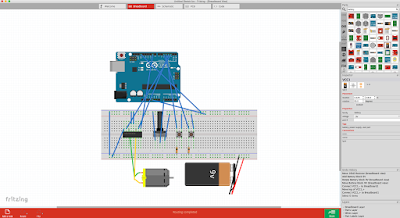
Fritzing Diagram:
Code used:
const int controlPin1 = 2;
const int controlPin2 = 3;
const int enablePin = 9;
const int directionSwitchPin = 4;
const int onOffSwitchStateSwitchPin = 5;
const int potPin = A0;
int onOffSwitchState = 0;
int previousOnOffSwitchState = 0;
int directionSwitchState = 0;
int previousDirectionSwitchState = 0;
int motorEnabled = 0;
int motorSpeed = 0;
int motorDirection = 1;
void setup(){
pinMode(directionSwitchPin, INPUT);
pinMode(onOffSwitchStateSwitchPin, INPUT);
pinMode(controlPin1, OUTPUT);
pinMode(controlPin2, OUTPUT);
pinMode(enablePin, OUTPUT);
digitalWrite(enablePin, OUTPUT);
}
void loop(){
onOffSwitchState =
digitalRead(onOffSwitchStateSwitchPin);
delay(1);
directionSwitchState =
digitalRead(directionSwitchPin);
motorSpeed = analogRead(potPin)/4;
if(onOffSwitchState != previousOnOffSwitchState){
if(onOffSwitchState == HIGH){
motorEnabled = !motorEnabled;
}
}
if (directionSwitchState !=
previousDirectionSwitchState){
if (directionSwitchState == HIGH){
motorDirection = !motorDirection;
}
}
if (motorDirection == 1){
digitalWrite(controlPin1, HIGH);
digitalWrite(controlPin2, LOW);
}
else {
digitalWrite(controlPin1, LOW);
digitalWrite(controlPin2, HIGH);
}
if (motorEnabled == 1){
analogWrite(enablePin, motorSpeed);
}
else{
analogWrite(enablePin, 0);
}
previousDirectionSwitchState =
directionSwitchState;
previousOnOffSwitchState = onOffSwitchState;
}
"Keep Moving"

Fritzing Diagram:

Code used:
const int controlPin1 = 2;
const int controlPin2 = 3;
const int enablePin = 9;
const int directionSwitchPin = 4;
const int onOffSwitchStateSwitchPin = 5;
const int potPin = A0;
int onOffSwitchState = 0;
int previousOnOffSwitchState = 0;
int directionSwitchState = 0;
int previousDirectionSwitchState = 0;
int motorEnabled = 0;
int motorSpeed = 0;
int motorDirection = 1;
void setup(){
pinMode(directionSwitchPin, INPUT);
pinMode(onOffSwitchStateSwitchPin, INPUT);
pinMode(controlPin1, OUTPUT);
pinMode(controlPin2, OUTPUT);
pinMode(enablePin, OUTPUT);
digitalWrite(enablePin, OUTPUT);
}
void loop(){
onOffSwitchState =
digitalRead(onOffSwitchStateSwitchPin);
delay(1);
directionSwitchState =
digitalRead(directionSwitchPin);
motorSpeed = analogRead(potPin)/4;
if(onOffSwitchState != previousOnOffSwitchState){
if(onOffSwitchState == HIGH){
motorEnabled = !motorEnabled;
}
}
if (directionSwitchState !=
previousDirectionSwitchState){
if (directionSwitchState == HIGH){
motorDirection = !motorDirection;
}
}
if (motorDirection == 1){
digitalWrite(controlPin1, HIGH);
digitalWrite(controlPin2, LOW);
}
else {
digitalWrite(controlPin1, LOW);
digitalWrite(controlPin2, HIGH);
}
if (motorEnabled == 1){
analogWrite(enablePin, motorSpeed);
}
else{
analogWrite(enablePin, 0);
}
previousDirectionSwitchState =
directionSwitchState;
previousOnOffSwitchState = onOffSwitchState;
}
Week 16 | Final Project Update 4/5
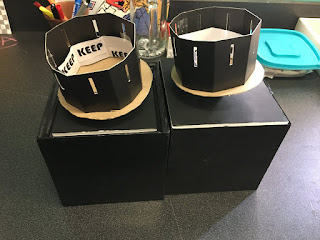
After assembling one of the zoetropes successfully, I'm now going to assemble the second one. I'm planning on using sturdy foam board as a cover. The boxes I made will hide the arduino and breadboard. Only the motor and whats assembled above will be seen.
Tuesday, December 6, 2016
Week 16 | Final Project Update 3/5


Week 1 Homework August 24, 2016 |
Read pages 1-36 in Tha Manga Giude to Electricity and post questions to blog.
Book has been ordered.
Appliances:
1. Hair dryer
watts
amps
volts
2. Crock Pot
watts
amps
volts
3. Microwave
watts
amps
volts
4. Toaster
watts
amps
volts
5. Cable Box
watts
amps
volts
What is the directional relationship between charge and current?
Book has been ordered.
Appliances:
1. Hair dryer
watts
amps
volts
2. Crock Pot
watts
amps
volts
3. Microwave
watts
amps
volts
4. Toaster
watts
amps
volts
5. Cable Box
watts
amps
volts
What is the directional relationship between charge and current?
Week 4 Mon. September 12, 2016 | DIY Variable Resistors Homework
Create a graphite drawing and connect it to an LED. Control the intensity of the light using the positive and negative lead cables and your breadboard. Make the drawing interesting and bring it to class on Wednesday.
Sunday, December 4, 2016
Week 16 | Final Project Update 2/5
Since I started working on this at home, I left my 9v battery on campus. I used my laptop to power up the motor and it seemed to be working fine.


However, after taking the video the motor seemed to not be speeding up when I moved the potentiometer. When I get back to campus, I plan on hooking up the battery and using that as the power source, hopefully the speed increases.
For now I'm following the zoetrope guidelines found in the arduino project book. I started building the pinwheel exercise as a reference, but I plan on buying card stock paper in other colors and tracing the template. My goal for now is to have this moving and working. I am still trying to figure out a way to enclose the wires and the arduino board. My challenge is going to be figuring out how to hold the motor upright in place with some sort of stand...
Week 16 | Final Project Update 1/5
At the beginning of the semester I thought I knew what I wanted my last project to be about. These last few mini projects of mine have been about using the LCD screen and using text to display what I wanted to say. I really liked the idea of motion and have decided to shift my ideas completely. I want to create my own zoetrope, and instead of having it show a picture moving, it'll have words instead.


Materials needed:
1 motor
potentiometer
buttons
h bridge
(not shown, 10k resistors and 9V battery)
Resources:
LINK


Materials needed:
1 motor
potentiometer
buttons
h bridge
(not shown, 10k resistors and 9V battery)
Resources:
LINK


Tuesday, November 15, 2016
Mini Project 2 Update 4/5
Unlike for my first mini project, I soldered everything and actually managed to not mess up.


I soldered two breadboards together because the length of my box is 6 inches, and the longer breadboard's width would not fit into my box. This worked to my advantage and made things easier for me in the end and now I learned how to connect multiple breadboards together.
The next step from here is to finalize the text I want it to say. I also need to figure out how I am going to hide all the wires once you open the box the arduino will be enclosed in.


I soldered two breadboards together because the length of my box is 6 inches, and the longer breadboard's width would not fit into my box. This worked to my advantage and made things easier for me in the end and now I learned how to connect multiple breadboards together.
The next step from here is to finalize the text I want it to say. I also need to figure out how I am going to hide all the wires once you open the box the arduino will be enclosed in.
Monday, November 14, 2016
Mini Project 2 Update 3/5
Unlike for my first mini project, I am going to solder all my wires to my breadboard to make sure nothing pops out when people pick up the box that I am going to use for the case.


I am also planning on using a box I made this summer in sculpture class in order to hide the wires. The box is all black and has a decorative handle. My goal is to make a cut out for the LCD screen so when you open the box all you see is the LCD screen.


Mini Project 2 Update 2/5
After trying to get the larger LCD screen to work (and contacting the website's support system) I still could not get the screen to light up and work. Because of time, I am going to use the smaller LCD screen again.
I am still using Project 23 from the Beginning Arduino book as a reference for my code. There are examples on how to move the code so while looking at that structure, I started writing my own to test it out (and it works):
#include <LiquidCrystal.h> //library
LiquidCrystal lcd(12, 11, 5, 4, 3, 2); //pin assignment
void setup() {
lcd.begin(16,2);
}
void loop() {
//options
intro();
second();
}
void intro(){
lcd.clear();
lcd.setCursor(14,0);
lcd.print("Once upon");
lcd.setCursor(16,1);
lcd.print("a time...");
delay(100);
for(int x=0; x<16; x++){
lcd.scrollDisplayLeft();
delay(450);
}
}
void second(){
lcd.clear();
lcd.setCursor(14,0);
lcd.print("there was a");
lcd.setCursor(16,1);
lcd.print("girl...");
delay(100);
for(int x=0; x<16; x++){
lcd.scrollDisplayLeft();
delay(450);
}
}
I am still trying to decide what text I want to display. I will be looking at poems and well known stories as a reference, but I might end up writing my own story for this mini project. I am still experimenting with having the text move from left to right- right to left. I am also still playing with the timer within the code to make sure the sentences are legible.
_______________________________
resources I have used so far:
https://code.google.com/archive/p/glcd-arduino/downloads
https://www.sparkfun.com/datasheets/LCD/GDM12864H.pdf ***
http://users.ece.utexas.edu/~valvano/Datasheets/ADM12864H.pdf
http://www.arduinoecia.com.br/2015/12/relogio-arduino-display-128x64-rtc-ds3231.html ***
http://nicuflorica.blogspot.ro/2013/01/arduino-si-un-afisaj-lcd-clasic-16.html
I am still using Project 23 from the Beginning Arduino book as a reference for my code. There are examples on how to move the code so while looking at that structure, I started writing my own to test it out (and it works):
#include <LiquidCrystal.h> //library
LiquidCrystal lcd(12, 11, 5, 4, 3, 2); //pin assignment
void setup() {
lcd.begin(16,2);
}
void loop() {
//options
intro();
second();
}
void intro(){
lcd.clear();
lcd.setCursor(14,0);
lcd.print("Once upon");
lcd.setCursor(16,1);
lcd.print("a time...");
delay(100);
for(int x=0; x<16; x++){
lcd.scrollDisplayLeft();
delay(450);
}
}
void second(){
lcd.clear();
lcd.setCursor(14,0);
lcd.print("there was a");
lcd.setCursor(16,1);
lcd.print("girl...");
delay(100);
for(int x=0; x<16; x++){
lcd.scrollDisplayLeft();
delay(450);
}
}
I am still trying to decide what text I want to display. I will be looking at poems and well known stories as a reference, but I might end up writing my own story for this mini project. I am still experimenting with having the text move from left to right- right to left. I am also still playing with the timer within the code to make sure the sentences are legible.
_______________________________
resources I have used so far:
https://code.google.com/archive/p/glcd-arduino/downloads
https://www.sparkfun.com/datasheets/LCD/GDM12864H.pdf ***
http://users.ece.utexas.edu/~valvano/Datasheets/ADM12864H.pdf
http://www.arduinoecia.com.br/2015/12/relogio-arduino-display-128x64-rtc-ds3231.html ***
http://nicuflorica.blogspot.ro/2013/01/arduino-si-un-afisaj-lcd-clasic-16.html
Wednesday, November 9, 2016
Mini Project 2 Update 1/5
My mini project is a continuation of my original idea for my final project. I am still interested in experimenting with telling a story using the LCD screens for this project. Since the mini project is focussing on the idea of movement, I want to focus on figuring out how to get the text to move around the LCD screen instead of just appearing. Instead of using a motor or servo to show physical movement, I wanted to show movement visually. I want to remove the tilt sensor that I had in my first mini project (that was in charge of generating the text when you move it) and have the text be generated by a timer in the code.
I'm planning on using this larger LCD screen because it will allow me an extra row for text.

I am still trying to figure out how I want to encase this mini project. I might just make a simple box and have the LCD screen just displayed. My original idea was to use a book again, however the process to carve out the inside of the book was lengthly and I was not happy with the outcome.
I'm planning on using this larger LCD screen because it will allow me an extra row for text.

I am still trying to figure out how I want to encase this mini project. I might just make a simple box and have the LCD screen just displayed. My original idea was to use a book again, however the process to carve out the inside of the book was lengthly and I was not happy with the outcome.
Monday, November 7, 2016
Week 11 Wednesday November 2, 2016 | Projects 23 & 24 in Ch. 8
Project 23 - Basic LCD Control
Project 11 in Project Book - Crystal Ball
Project 11 in Project Book - Crystal Ball
Project 24 - LCD Temperature Display
Week 10 Wednesday October 26, 2016 | Wave Sheild

1. SDRead Test
2. Play a whole list of files using DAPHC in Examples under WAVE HC
3. Play text to voice using PiSpeak HC or PI Party. They should be the same or similar. You will have to put another set of wav files on the SD card. Here is the zipped file
4. SampleRateHC
Monday, October 24, 2016
Week 10 Monday October 24, 2016 | Maxbotix sonar sensor In-Class Assignment
Group:
Vanessa Puello
Alberto Semper
Rodrigo Galarza
Vanessa Puello
Alberto Semper
Rodrigo Galarza
Tuesday, October 11, 2016
Mini Project Update 5/5
Here is the finished product:


*sorry some of the pictures are upside down
I was disappointed with the end result, and for my final project I might have to change the box I hold my breadboard in. Originally, I wanted the LCD screen to be horizontal, so when the cover is open you read the letters just like how you read the book. After hours of trying to fit my wires on the smaller breadboard, I got it to work however the LCD screen was VERY dim for some reason. Because of time, I decided to use the larger breadboard and have the LCD screen vertically instead.
I wanted to use a battery to power this, but my wires decided to break last minute and I did not have enough time to solder it again. Therefore, there is a hole on the side of the book to allow the USB cord to connect to my computer.

This mini project, I focused on getting the LCD screen to word and taught myself the code needed to generate random text. I am looking forward to using the larger LCD screen, because this one only holds 16 characters per line and it was difficult to say what I wanted to say.
MINI PROJECT CONCEPT
I created a little virtual diary with about 10 phrases that randomize whenever the book is moved around. The tilt sensor is VERY sensitive, so I am worried that not a lot of people will get the chance to see the "Dear Diary," part in the beginning. They might have to end up reseting it a few times in order to understand what I'm saying. Some of these phrases are based off of things I have experienced in my life.
Examples:


Mini Project Update 4/5
I decided to go with the Crystal Ball example in the Arduino projects book as a base for my mini project instead of the other example found in the Beginning Arduino book. This mini project's goal is to focus on getting the text to work how I want it to. I am also experimenting with the tilt sensor in order to randomize the text when someone picks up the book.
For my second mini project, I want to figure out how to replace the tilt sensor and use buttons instead to give out choices to the person interacting with it.
My process of hollowing out the book:


I used glue and mixed it with water to coat the three sides of the pages. I let it dry for 30+ min before I started carving. I left one blank page uncut in the beginning to make a slit for just the LCD screen to be seen.
For my second mini project, I want to figure out how to replace the tilt sensor and use buttons instead to give out choices to the person interacting with it.
My process of hollowing out the book:


I used glue and mixed it with water to coat the three sides of the pages. I let it dry for 30+ min before I started carving. I left one blank page uncut in the beginning to make a slit for just the LCD screen to be seen.
Subscribe to:
Posts (Atom)