For my final project I originally wanted to change the viewers environment. From the beginning it was my mission. As the project progressed I had to be more clear and specific about the environment I wanted to change. Below are multiple sketches of me trying to figure out how I would make the structure.
After going to the Center for Civil and Human Rights in Atlanta I know that I wanted to create something that the viewer would need to crawl or sit in. I experienced a lot of work there but one that stood out was a powerful piece (that used videos of multiple subject matter) that cover the top of the viewer. When you walk in you can stand or sit and only inside you can hear the video. It was big enough for multiple people to walk in at once. When you walk out you can go to another video or view a different installation. It was almost like a mini theater.
I also knew that I could use shower curtain to back project. I used this technique before in the CASE event and it worked well. This final sketch here is what brought helped me figure out how the structure would be made. One of my supervisors is an engineer. I showed him my sketches and he helped me brainstorm what I could make the structure out of that would be fairly affordable and simple to make. PVC pipes or the structure from a tent is what we came up with.
I originally thought I was going to have to hang the structure from the ceiling(not sure what made me think this).
During one of our crits Jen mentioned that my HappyFace video would be great to use for my installation. After thinking and brainstorming more I decided that this was the route I would like to go. HappyFace is an abstract video that touches on multiple health issues. One is mental health and the other is Sickle Cell Disease. In the video I'm experimenting with paint that is to visually represent blood in reference to Sickle Cell Disease.
Here is a diagram that helps you to better understand the back/rear projection. The projector is on the opposite side of the screen that the viewer is on. I appreciate back projection because the viewer can just focus on the visual instead of examining the projector and knowing the video source.
After viewing Madeline's mini project I knew I wanted to explore the proximity sensor. I knew I wanted something about the viewer interacting with the work but I thought I was going to use a touch sensor. After the first project, I didn't feel comfortable with people touching sensors. I didn't want any safety issues. I knew that with the proximity sensor the viewers presence would be the interaction with the work which I thought would make a powerful addition to the project.
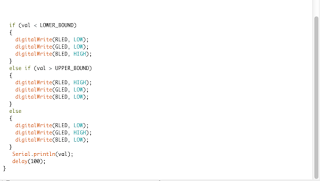
Here is the code I used, based of Chapter 3. I worked with this code with my proto type and 2nd mini project. I wanted to used those smaller projects to help me build up to this one. It really helped me in the end because I already knew my code worked. I did have to change the processing code in or to play the video but I had a nice base for my project.
Here is the processing portion of the code. I built off the codes I used in the mini project as well as the prototype.
https://www.arduino.cc/en/Tutorial/Graph
https://learn.sparkfun.com/tutorials/connecting-arduino-to-processing
Here is the prototype code and screenshot:
Video of prototype:
Lowes had a sale and I went to explore. I found PVC and some great connectors to build the structure.
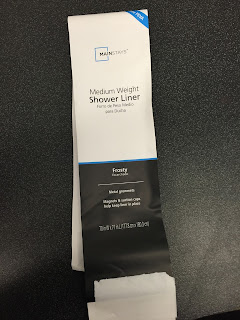
I used different size Frosty Shower Liner. The hardest part was getting the wrinkles out since it comes folded. I tried ironing and steaming, both worked but took a long time and was hard because I had to avoid melting it. I then tried the dryer which worked great. A couple minutes for each piece. Each side is a different liner.
Here is what it looked like as I merged the PVC and Shower Liner. I used super glue to put it on because it works but is easy to reposition and take apart. When I take apart the curtain the clear adhesive is invisible. I used Gorilla and it says it works on plastic but with enough pressure you could pull it all apart.
Below are lots of video and photos of the process. I really wish Katerie could have been here to see the result in person. I very happy at the way the structure came out. I'm shocked that I was able to assemble it by myself.
I decided to use my own comforter and pillows to mimic my bed. My bed is my safe haven yet it is also destructive because the longer I stay in it the worse impact it has on my reality.
The screen is full screen but there is a white bar on top of the screen from processing, I decided that I wanted it to say happy. Ernie pointed out in crit that he appreciated that it said happy. It adds to the piece because it helps the viewer see one thing when something else is really about to happen, I didn't want to title it something so obvious.
Overall I love my structure and it's quite overwhelming once inside. It's quiet beautiful but as the video plays it transitions into a darker place. During crit Erica mentioned that it was getting creepy and I'm glad that showed in the piece. I don't want the viewer to be too disturbed or creeped out because that's not what I feel my health issues are. One think that I want to show is that things are not always as it seems. And when the viewer goes in and hears the cheerful song and then experiences the transition, I feel like I'm getting this point across.
To sum it up I've showing the viewers, in an abstract way, a little bit of how it feels to have your safe haven turn into a dark place, the paint bubbles mimic blood from Sickle Cell Disease. The piece also speaks on what it's like to put on a HappyFace when other things are happening. I just want to state for the record that sometimes it's okay to not be okay.
Hiding the projector cords.
Using tape to mark the structure location. I was so fearful that I would have to move everything for the Video Class to crit so I marked things. I showed up at 8am to talk to (beg) the video class to see if I could leave my project. After some minor adjustments (and begging) I was able to leave my structure in the Black Box and it was not in anyone's way. Coordinating with the video class was very hard and when I was setting up the day before they were too, but we made it work.
There is a cut in the back of the structure for the sensor.
Here is one of the projectors. Once in the dark you can't even see the box I use to elevate it.
Hiding the sensor cords.
Using surge protectors. Charlie helped make sure we didn't all plug too many things in at once. We didn't want any issues with thinking blowing before crit.
So many items connected to the black box computer.
I nailed the cord up so no one would run into it.
Here is the projector in action.
Selfies of me with my project(I almost fell asleep). It was a beautiful moment.
Here s the extension cord with the charger to make sure my projector wouldn't die during crit.
More angles.
Here is the proximity sensor making all the magic happen.
Before hiding the sensor with tape.
Here are two of the projectors I used. It was a struggle to get them because the video class had crit the same day but Robert allowed me to use both and he used a different projector for his final.
I ended up buying another pica projector (that I will most likely return) to go on the ceiling. It was hard but before crit I climbed up the ladder and hooked my projected to the clip that it near the lights. Don't tell Michael, but I also hooked a long extension cord the the ceiling. I realized once I got to the top that the outlets on the ceiling don't work(worst timing ever). I'm afraid of heights, but even more afraid of failing so I got over it and climbed and used velcro to connect and clip the projector up.
I used the speakers in the black box.
Ivette participating.
Look at Charlie!
Charlie gave me feedback to possible have the projection only be viewable from the outside so that those from the outside see different from those in the inside. I disagree because I want the viewer in the inside to get the full experience but I do think that it would be interesting to have a different projection happening on the outside.
I figured out how to make the video the full size of the display.
Overall my feedback was good and it was nice to watch people participate with it. I need to really work on the placement of the sensor, the problem is that if I move it the video would show because the sensor would be too close to the structure. If I had more time I would have played with the code more. I would want the noise to transition to white noise at some point. I saw a few codes in processing about this. When asking Katerie for feedback it's something that was suggested but I did have time to play with the code more without it lagging more.


No comments:
Post a Comment