

Working with copper tape...

Programming the micro controller using the Arduino. The micro controller has pins where the parts of the circuit are connected to those pins would do what I wanted it to do.
The middle one has the "Blink" from the Arduino example programmed into it and the right one has "Fade". I left the one on the left to its default "Dice" function.

Micron pen for the black lines.
~~~touch~~~touch~~~touch~~~
Concept:
I wanted to make a parallel between art and birds, both being untouchable, by making it interactive so that the person is allowed to touch to make the LEDs light up. They have to figure out where to touch to do that, and I think part of the project was to make it a surprise.
Making it more like it belongs in a gallery space would have made the concept stronger.
If I had to do this again, I would use feathers and conductive paint as everyone suggested. And using a different kind of surface to play with. ^.^;
Code:
I used an AVRISP MKII to help program the micro controller using the Arduino.
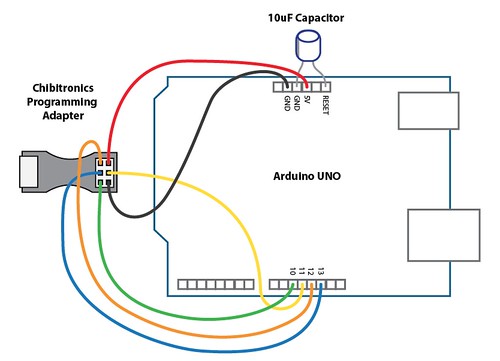

Code:
I used an AVRISP MKII to help program the micro controller using the Arduino.
For pin 2: (fade)
/*Code for the fading attiny45/85 in which pins fade in sequence.
 * When switch is pressed, all pins fade together.
 */
//                        attiny45/85
//                   reset -+---+- power
//      (switch input) pb4 -+   +- pb2 (fade 2)
//                  ground -+---+- pb0 (fade 1)
//
//               Ppins fade in sequence.  When switch is pressed, all pins fade on and off

void setup() {
  pinMode(2, OUTPUT);
  pinMode(4, INPUT);   // switch pin  (touch sensor)
  digitalWrite(4, HIGH);  // turn on pull-up resistor
}

void loop() {
  for (int k = 0; k<4;k++)
  {
    for (int i = 1; i<1000; i=i+10)
    {
      int switchValue = digitalRead(4); // read the switch.  0 if closed, 1 if open
      if (switchValue == 0)
      {
        digitalWrite(2, HIGH);
      }
      digitalWrite(k, HIGH);
      delayMicroseconds(i);
      if (switchValue == 0)
      {
        digitalWrite(2, LOW);
      }
      digitalWrite(k, LOW);
      delayMicroseconds(1000-i);

    }
    for (int i = 1; i<1000; i=i+10)
    {
      int switchValue = digitalRead(4); // read the switch.  0 if closed, 1 if open
      if (switchValue == 0)
      {
        digitalWrite(2, HIGH);
      }
      digitalWrite(k, HIGH);
      delayMicroseconds(1000-i);
      if (switchValue == 0)
      {
        digitalWrite(2, LOW);
      }
      digitalWrite(k, LOW);
      delayMicroseconds(i);
    }
    delay(200);
  }
}
For pin 1:
/*
  Blink
  Turns on an LED on for one second, then off for one second, repeatedly.

  Most Arduinos have an on-board LED you can control. On the Uno and
  Leonardo, it is attached to digital pin 13. If you're unsure what
  pin the on-board LED is connected to on your Arduino model, check
  the documentation at http://www.arduino.cc

  This example code is in the public domain.

  modified 8 May 2014
  by Scott Fitzgerald
 */


// the setup function runs once when you press reset or power the board
void setup() {
  // initialize digital pin 1 as an output.
  pinMode(1, OUTPUT);
}

// the loop function runs over and over again forever
void loop() {
  digitalWrite(1, HIGH);   // turn the LED on (HIGH is the voltage level)
  delay(1000);              // wait for a second
  digitalWrite(1, LOW);    // turn the LED off by making the voltage LOW
  delay(1000);              // wait for a second
}
Pin 0 stayed with the original Dice function.

No comments:
Post a Comment